Automatic online documentation for GitHub projects using Doxygen, Travis CI and GitHub pages
For a couple of weeks I’ve been putting my evenings into developing a neural network framework in C++. As the project has grown I’ve started thinking about how useful it would be to have an accessible documentation at hand. This immediately got me thinking about doxygen, a really nice tool for generating documentation in multiple different formats directly from comments in source code. By combining this with the Continuous Integration tool Travis CI and web hosting from GitHub pages I set up a system that keeps an online documentation up to date with the master branch of the project. This setup can quite easily be expanded and generalised to any kind of project hosted on GitHub.
The main idea behind the system is:
- We have a set of source files with descriptive comments
- html documentation for these is generated through Doxygen
- Travis CI runs Doxygen on every push
- Documentation is pushed to separate repository/branch
- Repository/branch is served using GitHub pages
An example of this setup can be found in my NNetCpp project, with the documentation pushed to the NNetDocs repository. This can then be reached through a GitHub pages website.
Source files
Although this setup will help with an easy deployment of the documentation, the quality of the documentation is fully dependent on writing informative comments. Doxygen allows for many different ways to comment your code. Everything from just a short sentence describing a function to entire constructs using keywords like \param and \return are supported. Take a look at the Doxygen documentation for how to comment your code to allow for generating documentation.
Doxygen
Doxygen is easy to configure and run. Downloads can be found on the website. On Debian-based linux distributions it can simply be installed with
sudo apt-get install doxygenTo use Doxygen with a project the only thing needed is a configuration file. In the project folder, run
doxygen -g <config-file-name>to generate a default one. This is a pretty big file and might seem frightening at first, but luckily we don’t have to change that much in it. It is also very extensively documented, making it easy to understand the different options.
This is a good time to consider the directory structure. This is the structure I’ve been using for my project.
ProjectFolder/
    +- doxygen.conf             Doxygen config file
    +- Makefile                 Makefile for project
    +- src/                     Source file directory
    +- documentation/           Documentation directory
        +- docs/                Directory for html documentation
        +- (Documentation.pdf)  (pdf documentation, if generated)
With this setup the documentation is kept in a completely separate directory. This is beneficial to keep our project top folder clean. It is also the documentation directory that we eventually want to serve using GitHub pages. Other project structures can of course also be used by adjusting some of the paths in upcoming steps.
We need to adjust some settings in our Doxygen config. These options are spread out throughout the file, so the easiest way to find them is to search for them.
PROJECT_NAME = "My Cool Project"The name of the project. Used for headers in the documentation.
PROJECT_BRIEF = "A short description of my project"Brief description of project. Used as subheader in documentation.
OUTPUT_DIRECTORY = "documentation"Directory to output all documentation into. Adjust this if you want a different directory structure.
INPUT = srcDirectories containing source files and direct paths to source files. All files to be included in the documentation needs to included here.
RECURSIVE = YESIf you have subdirectories in your source folders that you want to be included in the documentation set this to YES.
GENERATE_HTML = YESThis tells Doxygen to create a html documentation. (YES is already default)
HTML_OUTPUT = docsOutput folder of HTML documentation. The name docs later allows us to serve this folder specifically through GitHub pages.
GENERATE_LATEX = NOFor HTML documentation we don’t need this. See the chapter further down on how to extend this setup to also create a PDF documentation document.
HAVE_DOT = NODoxygen uses the dot tool to generate class diagrams. If you have it installed you can set this to YES. I did not feel like installing it, so I set it to NO to generate more simple diagrams.
There are plenty more options in the Doxygen config file that can be used to customize the documentation. Most can be understood by just reading the comments above them. For more in depth information see the Doxygen documentation.
To finally generate the documentation we simply run
doxygen doxygen.confdoxygen.confis the name of the Doxygen config file. This should create html documentation in the documentation/html directory. To look at it locally simply open documentation/html/index.html in a browser.
Since I have been using a Makefile for the rest of my project I decided to add the generation of documentation as a command in it:
.PHONY: docs

docs:
	doxygen doxygen.conf
With this we can simply run make docs to generate the documentation.
Travis CI
Travis CI is a Continuous Integration tool that can be used freely with open source projects on GitHub. It is mainly used for testing and deploying builds, but can be set up to do almost anything after a push. In this setup we will use it to generate the documentation and then push it to a separate repository/branch.
I prefer having a completely separate GitHub repository for the documentation. This allows for better separation between code and docs. Another benefit is that since the name in the GitHub pages URL is the same as the name of the repository we can then choose it freely on the documentation repository. You might prefer to deploy the documentation to the same project repository on the gh-pages branch. This can easily be achieved by changing some values in the Travis configuration. Note however that you then have to make sure that the html documentation is in the root folder for GitHub to serve it correctly.
To use Travis with your project you need to authorize it for use with your project repository. Follow the Getting Started page of the Travis CI documentation to get set up.
Travis is configured through a .travis.yml file in the repository. Travis runs on a virtual machine that pulls the repository and then runs multiple commands. In this file we need to prepare this virtual machine, generate the documentation and deploy it to our decided destination.
The entire .travis.yml file looks like this
language: cpp

branches:
    only:
        - master

sudo: enabled

before_install:
      - sudo apt-get update
      - sudo apt-get install -y doxygen

script:
    - make docs

deploy:
    provider: pages
    skip-cleanup: true
    github-token: $GITHUB_TOKEN
    keep-history: true
    on:
        branch: master
    local-dir: documentation
    repo: <github-username>/<documentation-repository>
    target-branch: master
Here’s what the different commands mean:
language: cppThe programming language used in the project. Here it is C++.
branches:
    only:
        - master
Only deploy documentation on pushes to master branch. Change this to fit with your branch workflow.
sudo: enabledAllow us to use sudo for installing packages.
before_install:
      - sudo apt-get update
      - sudo apt-get install -y doxygen
This is where we customize the virtual machine to support our scripts. Update package infrastructure and install Doxygen. -y is for automatically answering yes to the install prompt.
script:
    - make docs
Our script. Since we put the command in the Makefile it is enough to run make docs. If not using a Makefile you could easily put it in a bash-script or simply type out doxygen doxygen.conf in the .travis.yml.
deploy:
    provider: pages
This tells Travis that we want to deploy using GitHub pages. Travis has built in support for this, but it requires some setup from our side. For more information about deploying to GitHub pages see the Travis docs.
skip-cleanup: trueDo not remove the files that we want to upload.
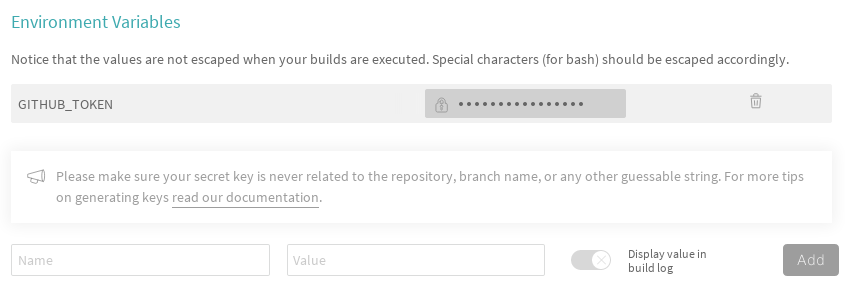
github-token: $GITHUB_TOKENIn order to allow Travis to commit to our repositories we need to give it a personal access token. The way to do this in a secure way is to add the token as a hidden environment variable in the Travis repository settings.
First go to your GitHub settings page. Under developer settings generate a new personal access token. If the repository you want to deploy to is public you only need the public_repo scope. If it is private you need repo.

Copy this token and go to the Travis CI repository settings for you project repository. Create a new environment variable named GITHUB_TOKEN and set the value to your personal access token. Make sure the Display value in build log slider is set to off so your token stays hidden.

Now Travis should be allowed to commit to our documentation repository.
keep-history: trueTells Travis to not force push, but keep the history of the repository.
    on:
        branch: master
Deploy when the push is to the master branch.
local-dir: documentationSelect what directory to push to the documentation repository. With the directory structure set up as described earlier we simply want to tell Travis to push the entire documentation directory.
repo: <github-username>/<documentation-repository>The repository to push the documentation to. Written on the form username/reponame.
target-branch: masterThe branch to push to on the documentation repository.
With this set up we can then push to our master branch and Travis will start a new job. Travis will generate the documentation and then push it to the documentation repository. If the Travis build would fail make sure to check the log file. From the log it should be clear what went wrong.
GitHub Pages
Now we have our documentation in a repository ready to go. We only have to tell GitHub to start serving it using GitHub pages.
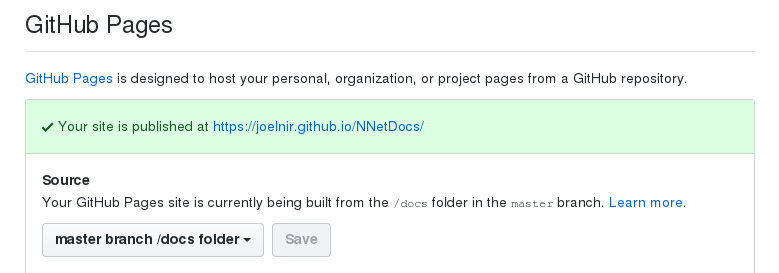
In the documentation repository, go to the settings tab. Scroll down to GitHub pages and select source master branch /docs folder. This is the reason why we chose the name docs for the html documentation directory in the Doxygen config.

Wait for a second and your documentation should be available at <github-username>.github.io/<repository-name>. Now we have a finished system that will update the documentation after each push to the master branch.
Everything should work as expected at this point, but once everything is set up we can expand on the system in different ways.
PDF from \(\LaTeX\)
One thing that could be nice is to also include the documentation as a pdf file in the documentation repository. This can be achieved by configuring Doxygen to output in LaTeX format and then using a LaTeX compiler to create a pdf file.
The only change needed in the Doxygen config is:
GENERATE_LATEX = YESThis tells Doxygen to generate a LaTeX documentation in the latex directory.
For compiling this documentation we need a LaTeX compiler and some extra packages. A common one is TeX Live, easiest installed on debian systems with
sudo apt-get install texlive texlive-latex-extraWe can now look at the pdf documentation by running
doxygen doxygen.conf
cd documentation/latex
make
This should create the file refman.pdf in the latex folder.
To automate this process and make sure that the pdf is pushed to our documentation repository we need to put this in a script. Once we are done with the LaTeX files they are unnecessary and should be deleted. I edited my Makefile to create the pdf, move it out of the latex folder and delete it.
.PHONY: docs

docs:
	doxygen doxygen.conf
	cd documentation/latex && make
	mv documentation/latex/refman.pdf documentation/Documentation.pdf
	rm -r documentation/latex
With this in the same Makefile command as before we don’t have to adjust the Travis config much. The only necessary change to .travis.yml is the addition of the LaTeX packages.
before_install:
      - sudo apt-get update
      - sudo apt-get install -y doxygen texlive texlive-latex-extra
Now Travis will also create a pdf documentation for you. The file Documentation.pdf can be found in the root of the documentation repository.
There are many other ways to adapt and expand on this setup for the needs of different projects. If you have any questions, ideas for improvements or cool use-cases feel free to reach out.